“A commit tells you who wrote it, when they wrote it, and who pushed it.” That was the story I was told when I started using git. Yet, none of that may be true. The author name and email are whatever the committer’s local config said they were at the time, the timestamps are whatever their machine reported, and the platform will render all of it next to a nice profile picture.
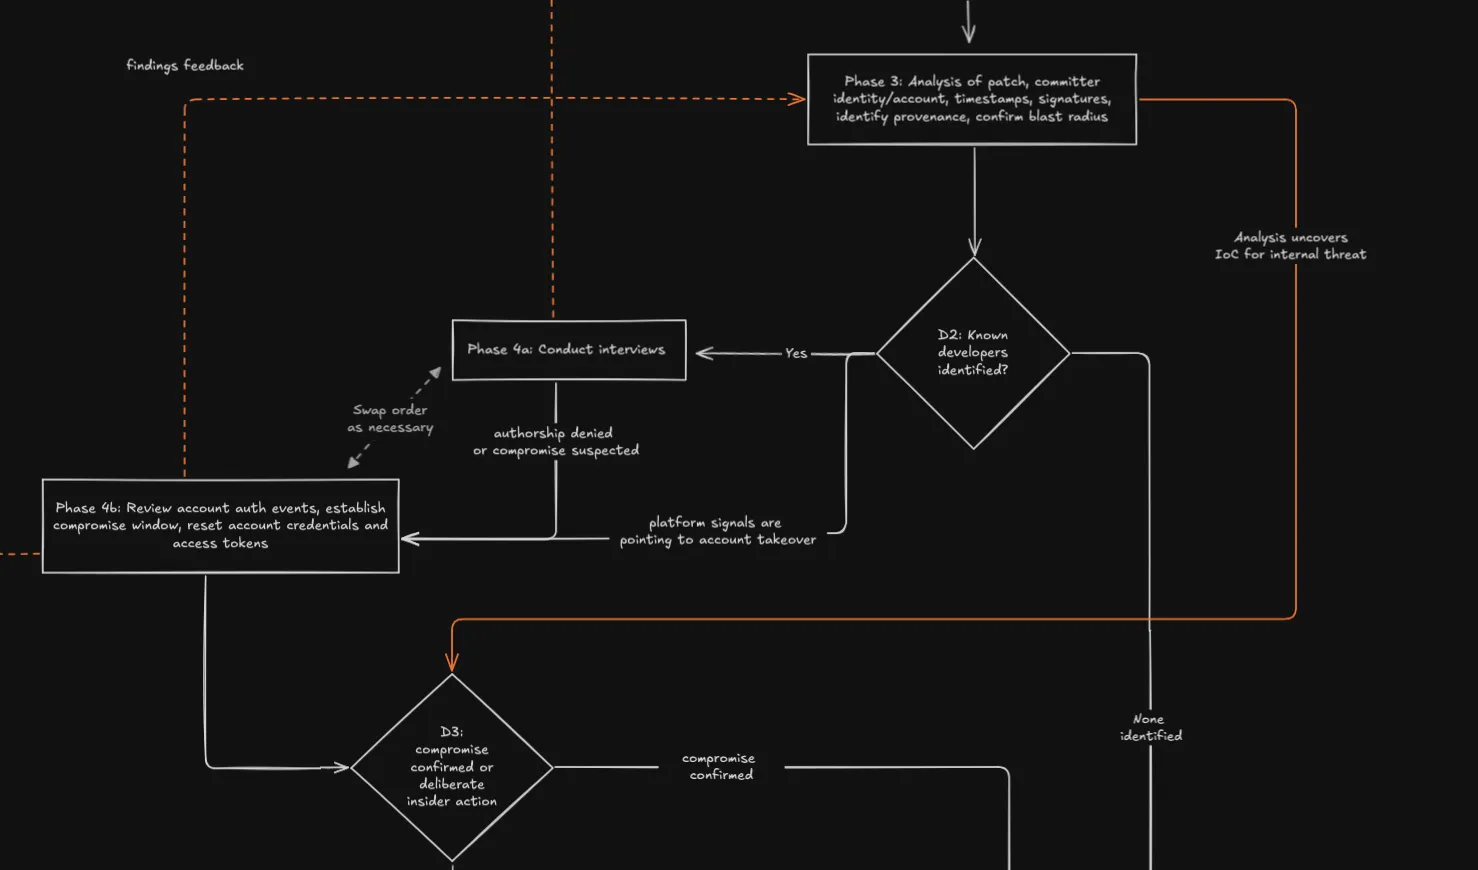
That gap is why a suspicious commit requires a process rather than a quick look. Whether the alert comes from our SIEM or from a threat intel partner, what follows is the same seven phases process: preserve the repository before anything moves, collect the information the platform holds, work out whether the patch is what it appears to be, and establish who actually pushed it.
Workflow diagram overviewSection titled Workflow%20diagram%20overview
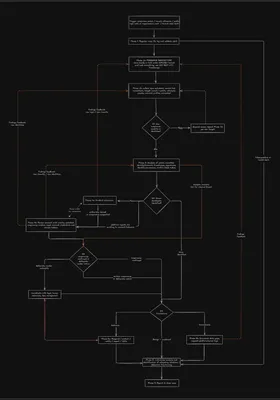
Phase 1 — Register Case, Prepare Worklog & Validate AlertSection titled Phase%201%20%u2014%20Register%20Case%2C%20Prepare%20Worklog%20%26%20Validate%20Alert
The first thing I do when I begin any investigation is to create a case and prepare a worklog and timeline worksheets. These will be used to trace my steps throughout the investigation and help me when creating the final report.
Then, I add the first evidence item as E001. This will contain the patch that triggered the alert, the commit reference, or intel alert, exactly as it was received by our systems. I hash everything to make sure that if something is ever altered during or after the investigation it shows up.
Before proceeding with the investigation I validate that the alert is genuine and that it requires investigation. I wouldn’t want to spend time and resources on a false positive, like a genuine commit from a colleague working on a public repository, for example. If the false positive is confirmed, then I close the case with the respective conclusions and proceed to looking into fine-tuning the alert if possible.
Proceeding further means that the alert has been confirmed, and the next step is to document authorization and scope of the investigation.
During this phase, and depending on the alert type and initial assessment, I also set specific rules of engagement: what identities to use and how much “noise” to make. For example, if an attacker is trying to push malware to an organization’s repositories, a sudden repository fork from an Infosec account might spook the attacker before I can collect the necessary information to complete my investigation. Worth knowing here: for a public repository, anonymous clones and unauthenticated API reads leave no trace the repository owner can see, while a fork is publicly visible in the fork network the moment it happens. So when staying quiet matters, the mirror clone is the silent option and the fork is the louder one.
One word of caution: research accounts created to conceal identity sit in grey territory under platform terms of service, and if the case ends up in front of a court or a regulator, “we collected evidence using accounts created to hide who we are” is a conversation to have had with legal before collection, not after. Get the rules of engagement, including the identity question, signed off as part of the authorization.
Phase 2 — Preservation of evidenceSection titled Phase%202%20%u2014%20Preservation%20of%20evidence
This phase is split into two parts in the diagram, but it is completed in a single sequence. First, I either clone the repository on an Infosec machine or fork it into the Infosec tenant, with the visibility trade-off from Phase 1 deciding which. This preserves the Git information containing the data that triggered the investigation.
The clone has to be a mirror. A normal git clone fetches all branches and their reachable tags; it does not
pull the other ref namespaces the remote advertises, things like refs/pull/* on GitHub or refs/merge-requests/* on GitLab, and
exactly those refs might come in handy later in the investigation:
git clone --mirror https://github.com/org/repo.git evidence/case-2026-001/repo.gitAfter fetching and storing the Git objects and their hashes as evidence items, I start collecting specific information, some of which is only available in the platform where the repository is stored. Part of the information I fetch in this stage is repository metadata, commits list, committers, reference events, account profiles etc. This information helps me to understand if there are any other suspicious commits that I need to look into and start tracing a timeline of the events leading to the alert being triggered.
If I identify any new suspicious commits, either from the same account or from other suspicious accounts, I update the scope of the investigation and document the additional data in my worklog.
Most of this collection process is repetative, so I automated it.
The collect_commit_evidence.py
walks the GitHub and GitLab APIs for repository metadata, the commit list, contributors, the target commit with its patch and diff, etc.
Every response is written to the case directory and SHA-256 hashed into a manifest, alongside a log recording the URL, HTTP status
and UTC timestamp of each request. It ends by printing a single sha256(hashes.txt) value, and that final hash gets recorded in the case
management system, at collection time.
If the scope changes, re-running the Python script just adds the new data into the case folder keeping the existing records and their hashes.
A note before running it: some of what it collects also depends on plan tier. GitHub audit log endpoints need Enterprise Cloud, while GitLab audit events need Premium or Ultimate at the time of writing. And on GitHub there’s a harder constraint than tier: Git events, the clone, fetch, and push entries, are retained for only seven days and are only accessible through the REST API, not the web UI. The rest of the audit log goes back 180 days. If the alert is about a push, the log entry for that push has a one-week shelf life, which is why collection can’t wait.
Phase 3 — Analysis and Confirmation of Blast RadiusSection titled Phase%203%20%u2014%20Analysis%20and%20Confirmation%20of%20Blast%20Radius
This is the point in the investigation where my developer background earns its keep. Reading a patch is not the same as understanding it. A line that concatenates variables is, for the vast majority of the time, ordinary development. The same line changes character when the result is handed to a shell, and experience with how software is actually written tells you which lines deserve further investigation: start tracing the data back to its source, and establish whether that flow was ever part of the intended program or a door left open for later.
These are a few of the points I am looking at most often:
-
The patch itself: I search for obfuscation, encoded blobs, outbound network calls, install-time hooks, edits to CI definitions
(.github/workflows/, .gitlab-ci.yml), and anything touching credential-adjacent files. -
Committer identity: I treat author and committer as separate claims and look for an explanation for any split between them. I compare the git identity against the platform linked account: unverified email addresses are easily spoofable, so a “commit by” a maintainer proves nothing to me without a signature or a verified account linkage. I also check account age, contribution history, and name similarity to legitimate maintainers. If the account turns out to be real but taken over, that’s a distinction worth looking deeper into, because it changes who the subject of the investigation is.
-
Timestamps: I measure the delta between AuthorDate and CommitDate, look for backdated commits mixed into existing history, and compare the activity profile of the commits against the claimed identity’s established pattern.
-
Signatures: An unsigned commit in a history where the maintainer’s habit is to always sign is a signal I follow up on. Also,
verified: trueonly tells me someone possessed a key, so next I need to establish who really owned the key, and when it was added to the account. The clearest example of why the badge alone might still be misleading: commits made through GitHub’s web UI are signed by GitHub’s own web-flow key and render as “Verified”, so an attacker with a compromised account editing files in the browser gets the green badge without ever touching a key of their own. Which key signed the commit matters more than whether one did.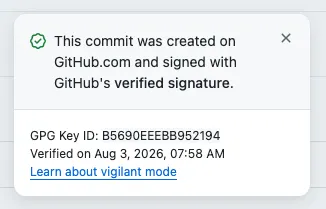
-
Provenance: I determine which refs actually contain the commit, and whether it arrived through a reviewed PR/MR or was pushed directly to a protected branch. On GitHub I check the fork namespace. Forks share an object store with their parent, so a URL like
github.com/org/repo/commit/<sha>will render a commit that exists only in someone’s fork, but showing the parent’s name in the URL and the full diff, with no branch in the parent containing it. Deleting the fork doesn’t reliably remove the object either. So I verify containment against refs in my mirror rather than trusting the rendered GitHub page: if nothing in the repository is found, that’s a different finding than the URL suggested. GitLab doesn’t render fork-only commits under the parent project’s URL, so this particular trick doesn’t apply there (though under the hood GitLab also deduplicates fork objects into shared pools, the storage sharing just isn’t exposed the same way). The containment check is worth running regardless of platform:
git -C evidence/case-2026-001/repo.git branch --contains <sha>git -C evidence/case-2026-001/repo.git tag --contains <sha>- Blast radius: I enumerate the tags, releases, and branches containing the commit; the package versions that shipped from it; the downstream consumers of those versions; and every CI run that executed the repository in its malicious state. This is where a case gets classified as a supply chain compromise rather than an isolated repository incident; the distinction being whether anything downstream actually consumed the malicious state.
Phase 4 — Interviews and credentials analysisSection titled Phase%204%20%u2014%20Interviews%20and%20credentials%20analysis
The repository, the commits, the metadata, the patch, all of it now sits safely in my custody. Everything up to this point I collected and analysed on my own in an isolated lab environment. Phase 4 is the phase where I reach out and get a person’s perspective of what happened, or look into the person’s account information to check for signs of compromise.
Phase 4a — Interviews with the collaboratorsSection titled Phase%204a%20%u2014%20Interviews%20with%20the%20collaborators
The analysis from the previous phase usually surfaces people: maintainers who merged the change, reviewers who approved it, and an identity behind the commit. The trickiest part of having a conversation with any of the identified people is that they can be either a victim whose account was used or the subject of the investigation. And at this point I may not have sufficient context to know which role they played.
During these conversations it may surface new indicators: an unfamiliar CI token, a machine that shouldn’t have had push access, a review that someone doesn’t remember giving. Anything that names a commit, a branch, or a repository I don’t already hold sends me back to Phase 2, where I preserve and hash it before it becomes evidence I feed further into the analysis.
Additionally, if the person named on the commit says they didn’t make it, I treat that as an account compromise signal and start the account review immediately.
Phase 4b — Account review and access credentials resetSection titled Phase%204b%20%u2014%20Account%20review%20and%20access%20credentials%20reset
Here I’m trying to establish whether the account was compromised and, if so, the scope and time window. If the evidence points to an insider instead, I reclassify the incident and bring in legal and whoever else the process names.
Account review gives me two kinds of output and they go to different places. Auth events that reveal commits or branches I haven’t seen send me back to Phase 2 for preservation. Findings about commits already in evidence, like a session that explains a timestamp anomaly, or a token that accounts for an unsigned push, send me straight back to Phase 3 to recheck the data and make sure the conclusions up until this point still hold.
Note: coordination with legal isn’t triggered only by the interviews. If insider indicators show up during patch analysis or the identity checks, I escalate straight from Phase 3 and skip 4a entirely. Interviewing a suspect ahead of the people whose job it is to handle that situation may cost me both the evidence and the option of handling it properly.
Both 4a and 4b attack the same question from opposite directions: did the person mentioned on the commit actually make the commit? In 4a I ask the person. In 4b I ask the logs. Neither is a prerequisite for the other, which is why they’re interchangeable in my workflow and driven by whichever signals the investigation has produced thus far.
They fail differently, too: testimony arrives quickly but can be mistaken, incomplete, or dishonest; authentication telemetry is harder to argue with but slower to obtain and may be missing exactly the time window I need.
What decides the order for me is which risk I’m willing to carry and for how long. If I reset credentials first I close the attacker’s access, but if this turns out to be an insider they now know I’m looking. If I interview first I keep the element of surprise, but an attacker with a live token keeps it for the length of the conversation.
Decision point — account compromise, insider threat, or innocent mistake?Section titled Decision%20point%20%u2014%20account%20compromise%2C%20insider%20threat%2C%20or%20innocent%20mistake%3F
Phase 4 ends with a decision point: was this an account compromise, a deliberate act by someone with legitimate access, or neither?
If it’s compromise, the account owner is a victim rather than a subject. The credential reset already happened, and what I carry forward is the compromise window and everything the account did inside that window stays in scope.
If it’s deliberate insider action, I stop investigating alone. This is another point where I consult with legal, while my role narrows to documenting and presenting the evidence rather than deciding what happens next. If earlier indicators found during Phase 3 already triggered an escalation, this is simply where that path rejoins.
If it’s neither, because the commit is explained, the identity holds up, and the timestamps make sense, that’s a real finding too. Most alerts end here, and that’s what feeds the detection tuning later on.
Phase 5 — Respond, or document what I couldn’t getSection titled Phase%205%20%u2014%20Respond%2C%20or%20document%20what%20I%20couldn%u2019t%20get
All three paths converge on the same question: was there malicious activity, was there a benign explanation, or is the evidence inconclusive? A malicious verdict moves into containment and notification (Phase 5a in the diagram). A benign one goes straight to root cause analysis, which usually ends up in detection tuning, since something raised an alert on legitimate work.
Inconclusive isn’t a failure state; it means I’ve exhausted the evidence I can obtain on my own and the remaining answers sit with the platform or the repository owner. In a typical case, the compromise window can’t be completely reviewed because the platform’s retention has already run out. On GitHub that means 180 days for audit events but only seven days for Git events, so the push and clone records for anything older than a week are simply gone; or the audit endpoint needs a plan tier that isn’t available at that time. The Phase 5b path documents these gaps and requests what’s missing, and if anything comes back, the investigation reopens.
Phase 6 — Root Cause and MitigationSection titled Phase%206%20%u2014%20Root%20Cause%20and%20Mitigation
Three different paths arrive here, and they ask different questions.
If the finding was malicious, root cause is about the path inside: how did a commit that shouldn’t exist end up in a branch that mattered? Usually the answer isn’t the commit at all, instead it’s a missing branch protection rule, a service account with more scope than it needs, or a review requirement that can be satisfied by the same person who opened the PR.
If it was benign but alerted, the root cause is about the detection: something legitimate looked wrong enough to spend time investigating. That’s worth fixing, both because the next false positive costs time and because analysts who see the same benign pattern repeatedly stop looking at it carefully.
If it was a false positive or invalid alert caught back in Phase 1, before I committed real effort, the same applies, just cheaper.
What comes out of this phase isn’t a list of everything that could be better. Instead, it’s the smallest set of changes that would have either prevented this or surfaced it sooner, each with an owner.
Phase 7 — Report and CloseSection titled Phase%207%20%u2014%20Report%20and%20Close
The report is written for someone who wasn’t there and may read it a year from now: a successor, an auditor, etc. Every conclusion traces back to an evidence item, and where I inferred rather than proved, the report says so.
What goes in the report is the timeline, the evidence register with hashes, what was determined and on what basis, what remains unknown and why, the actions taken and who authorized them, and the mitigations from Phase 6 with owners and dates.
Then the case closes. If it closed inconclusive pending further data, the closure states what was requested and from whom, so that whoever picks it up when the data arrive knows where the thread was dropped.
Making the next investigation easierSection titled Making%20the%20next%20investigation%20easier
Require signed commits, and enforce it. This is one of the highest leverage controls available, but only when it’s fully enforced. When enforced, an unsigned commit on a protected branch simply can’t be pushed, because neither GitHub nor GitLab will allow it — with two caveats. On GitLab, rejecting unsigned commits is a push rule that needs Premium, the same tier gate as the audit events mentioned earlier. And on GitHub, remember the web-flow key: a commit made through the browser is signed by GitHub itself and passes signature enforcement, so signing enforcement narrows the attack surface without closing it. What it reliably gives you is the audit trail: which key signed the commit, and when that key was added to the account.
The disadvantage is that signing introduces developer friction. Contributors lose keys, CI systems need their own signing identity, and mixed tooling teams hit edge cases constantly. On a repo with heavy external contribution it can slow things down. My opinion is that it is worth it on anything that ships to production, and often not worth the fight on internal tooling repos. Decide per repository rather than organization wide, or an exception process can quietly become the norm.
Know which keys are authorized, and when they were added. Enforced signing tells you a commit was signed. It doesn’t tell you the key belonged to someone who should have it. Keep a record of key additions to accounts, because a key added the same week as a suspicious commit is one of the strongest signals available, and it’s visible when audit logs are monitored.
Protect branches properly. Require pull requests on protected branches, require review from someone other than the author, and block force push and deletion on anything tagged or released from. Force push to a protected branch is the mechanism behind most history rewriting, and disabling it removes the technique. The Git history should tell the full story of how a feature or bug fix landed in the codebase.
Treat CI configuration as privileged. Changes to .github/workflows/, .gitlab-ci.yml, and equivalents deserve their own review requirement and their
own alert. A workflow file is code that runs with credentials, and it’s among the most common things an attacker actually wants to read and/or modify.
Similarly, don’t let workflows from forked PRs access secrets.
Scope tokens and rotate them. Fine grained tokens over classic ones, per repo instead of per organization, expiring over permanent. Most compromise windows I’ve had to establish were as wide as they were because a token had no expiry and nobody knew it existed.
Alert on the things that are rare rather than the things that are bad. A commit whose AuthorDate and CommitDate differ by days or even weeks, a first-time contributor touching CI, a push directly to a protected branch, a new signing key on an account with commit access, none of these are inherently malicious, and that’s the point. They’re rare enough to look at every time, which is what makes them useful.
Keep the audit log somewhere you control. Platform retention is shorter than most people assume, and for the events that matter most in a repository investigation it is dramatically shorter: GitHub keeps audit events for 180 days but Git events, like clone, fetch, push, it keeps for only seven, and API-only. The gap between a compromise and its discovery is almost always longer than a week. Shipping these logs to your SIEM as they’re generated is the difference between establishing a compromise window and writing “inconclusive, logs unavailable” in Phase 7.
If you only pick two of these, enforce commit signing and ship your audit logs to a SIEM. Signing doesn’t prove who made a commit, but it replaces a question you can’t answer: is this committer legitimate?, with one you can: which key signed this, and when was it added to the account. Logs you control are what let you answer that second question after the platform’s seven-day window on Git events has closed.
Reference pointsSection titled Reference%20points
- https://docs.github.com/en/organizations/keeping-your-organization-secure/managing-security-settings-for-your-organization/audit-log-events-for-your-organization
- https://docs.github.com/en/enterprise-cloud@latest/organizations/keeping-your-organization-secure/managing-security-settings-for-your-organization/reviewing-the-audit-log-for-your-organization
- https://docs.github.com/en/authentication/managing-commit-signature-verification/about-commit-signature-verification
- https://docs.gitlab.com/user/project/repository/push_rules/#verify-users
- https://docs.gitlab.com/user/project/repository/signed_commits/
- https://git-scm.com/docs/git-clone#Documentation/git-clone.txt---mirror